Water Dye Nail Art Tutorial, Teach You How To Diy By Yourself~
Today, I will introduce a beautiful and fashionable new way of nail art-water dyed nail art.
Water-dyed nail art can DIY colors and patterns by yourself, unique, stylish, and beautiful.
However, there are specific difficulties in the operation process, and there are requirements for nail polish and time control.
Note: Not all nail polishes are suitable for water staining.
Let's take a look at how to make water-dyed nail art~
Preparation materials: nail polish, small sticks or toothpicks, nail polish, bright nail polish, nail polish, water, cup.
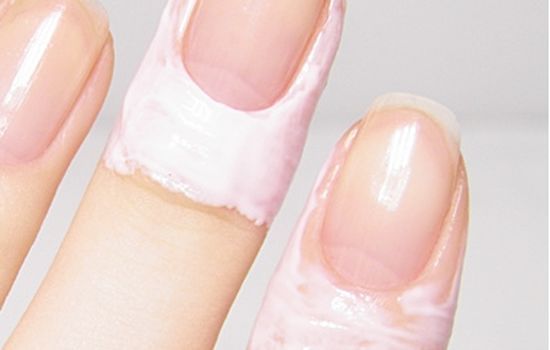
PS: Cover the parts other than the nails with peeling nail polish to avoid nail polish contamination.

Water dyed nail art tutorial.
Step 1:
- Apply a layer of nail polish.
- A layer of base color (easy to paint).
- Apply the peeling nail polish around the nails.
- Could you wait for a while to dry it?
Do pay attention! The range to be applied is more comprehensive! Because you need to put your hands in the water, you should also paint the border between your nails and fleshy flesh~

Step 2: Next, prepare a glass of water, then open all the prepared nail polishes, and drip the nail polish into the water at a breakneck speed, remember! Be fast!

Step 3: Next, use small sticks or toothpicks to make marble textures. You can also draw your favorite textures according to your preferences.

Step 4: Next, put your hands in the water, bend your hands to the angle where your nails fit the water surface, like the picture below.

Step 5: Next, take your hand out of the water. Before you take it out, use a small stick or toothpick to drive away from the excess nail polish around your fingers. Otherwise, it will bring out a lot of extra nail polish, then gently handle it. Could you pick it up~?
Step 6: Use the small corners of the paper towel to dry the water gently, and then it's time for us to tear the nail polish to show its magical powers~ The excess nail polish only needs to be gently torn off with tweezers~ When~ just like Same as below~

Step 7: After tearing off all the nail polish, tidy up the surrounding area a bit, and then apply a layer of bright nail polish to complete it. You can also add your favorite small decorations~

Precautions
1. Is nail polish easy to condense? Did it sink into the water?
After reading the guide, many netizens said, "The nail polish dries too fast, and the pattern is set before it is drawn." "The nail polish drops and sinks into the water "... In fact, this phenomenon does exist. First of all, the clean water we prepare should be warm. Coldwater is easy to condense. Secondly, don't drop too much at a time. One drop at a time will not sink into the water unless the selected nail polish is too dry.
2. Uneven color of nail polish?
The uneven thickness of the upper nail is very common due to the different degrees of condensation of the nail polish applied successively. Therefore, before water dyeing, you must first apply a layer of nail polish, and then use a layer of the pure base color; and secondly, when applying nail polish DIY patterns, the speed must be fast.
3. Will there be blisters on the nails?
After putting your finger in the water and applying the film, blisters may appear on the nail's surface, which affects the appearance. This is mainly because the nail polish film has gradually formed, and this problem can be avoided by quickly and decisively entering the water.

All right
The tutorial has been given to you.
Think about how to DIY
Is a water-dyed manicure suitable for you?


Comments
Post a Comment